Welcome to Binky Blossoms, Thank You for sharing a part of your day with me. Sit down, Relax, Listen to some Music and Just Enjoy!

Monday, September 26, 2011

BBTB2 Blog Hop and Wheelbarrow Challenge!

 Hello again everyone, and how are you this fine Monday!? We are expecting rain here in Kentucky but I actually hope it holds off till tomorrow because I don't work tomorrow and I love to craft when it rains. How about you, when do you like to craft?  That is my question for you this week and one stipulation of my blog hop candy, lol! I'll get to that in a bit tho, Candy that is, first of all the challenge for this week over at Bitten By The Bug 2 is the Amazingly Talented, and someone I always look to for inspiration, Donna, and her pick for this week is to use the "Wheelbarrow" from the Walk In My Garden. Another oldie but a goodie and actually was the third cartridge I ever bought for my Cricut. Now if you arrived here from Agnes's Blog (who is another amazingly talented Design Team Sister and Friend) you are on the right track, but if you ever get lost you can start at the beginning at the BBTB2 Blog!

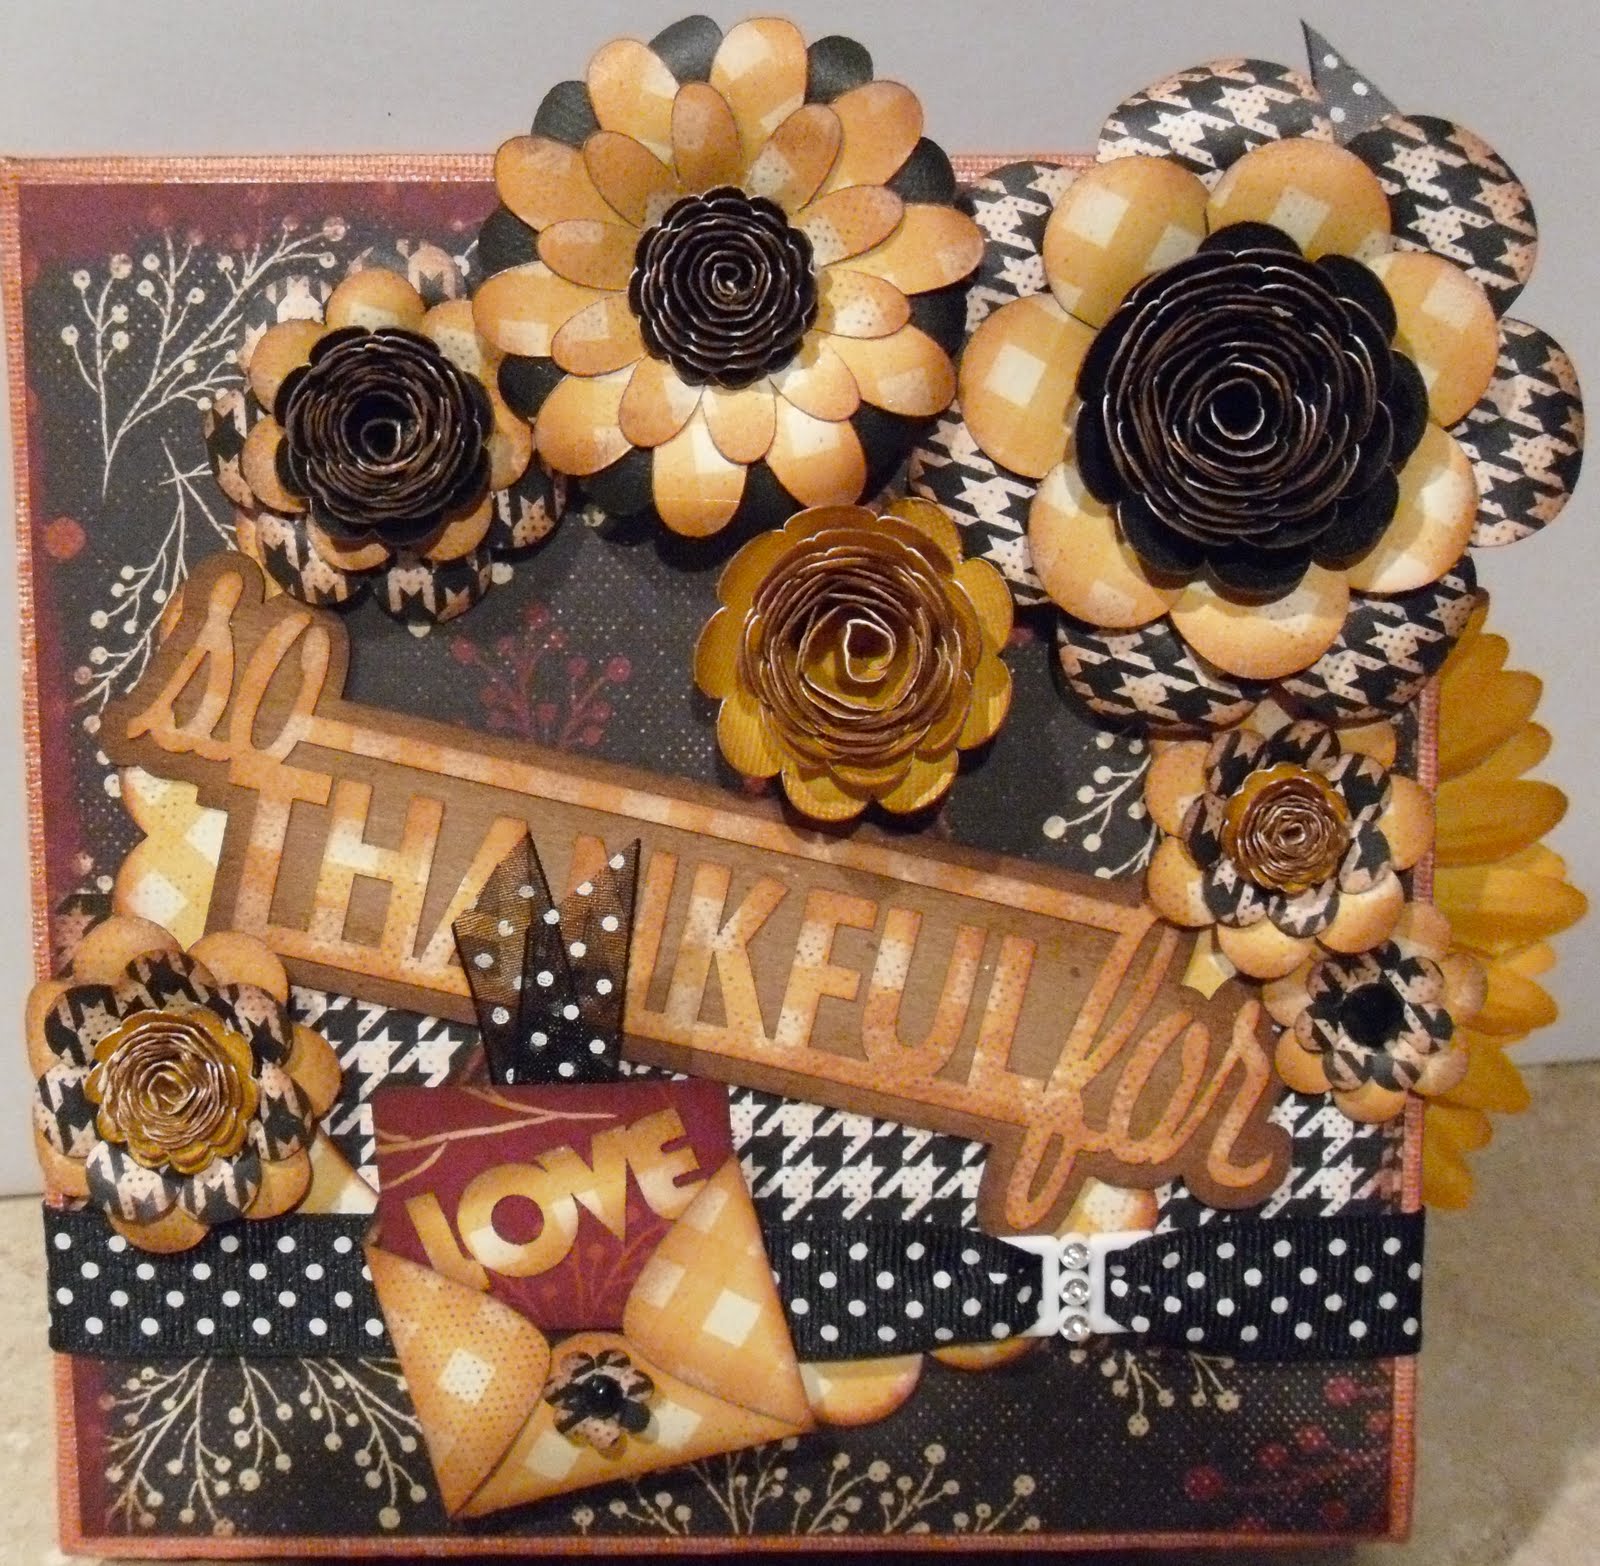
Well I made a card for this challenge. I should be making fall cards but I had to get one more bright and summery card to put an end to summer. I created this in Design Studio using "Walk In My Garden" and the good ole trusty "George" cartridge. Lots of welding and for the saying I just used the pre-programed words on the WIMG cart. Lots of dimension with foam pop dots, some bling, stickles, doodling, chalk and ink..........................  
 And I finished the inside of the card too! Woo Hoo!
 Here's a view of all the dimension and pop.

Your next stop is my Lovely Design Team Sister Penny on the Hop and if you ever get lost you can hop on over to the BBTB2 Blog and make sure you haven't missed anyone or start there if this is your first stop.
And here's a little something that I'm giving away for some Blog Candy. I added some tissue paper in there because I have a tutorial that is coming up that I will be making flowers out of tissue paper so then you'll already have a heads start and some to play with along with the other goodies I'll be sending. Now to win my candy, it's pretty simple, You just HAVE to be a follower, leave a comment, and tell me when do you like to craft, when it rains, in the AM, PM, middle of the night, weekends, on a full moon (lol) you get it, just when do you like to craft, I'll be drawing a winner next Sat. Oct. 1st. and posting here on my blog so make sure you check back. I also hit 500 followers on my blog so I may just have another piece of candy for a lucky follower because if it wasn't for all of you I wouldn't be here.
Well I hope you join in the challenge, it is open for 2 weeks and the only requirement is that it has to be a NEW project! And if you don't have the Walk In My Garden just remember that you can use ANY wheelbarrow from any cart to play. Just link up to the linky tool on the BBTB2 Blog and you could win our fun BBTB2 Blinkie along with braggin rights of course! And don't forget to Hop to each of the Amazing Design Team Gals and see the amazing creations that they came up with, they always blow me away with what they do! Amazing!
Well I hope you have/had fun on the Hop and have a great week, and get to get some crafting in. I still have a few things to finish for upcoming posts so keep your eyes out for some more fun projects and hope to see you over at the BBTB2  challenge.

((Hugs)) and Take Care,
Theresa   

Sunday, September 25, 2011

Blessed Canvas with a Transfering Large Bling Tutorial!


This was my first attempt at a canvas project (other than the mini book canvas kits) and I have to say I Love the way it turned out and I already have another in the works, lol! I went to my very first Private Reserve also (boy lots of first here, lol) and all I can say is if you Ever get a chance to go to one, YOU MUST GO! I got to go to the Atlanta, GA Private Reserve and had a BLAST! Busy the whole time I was there and this was one of the projects that we did! It is done with a 10 x 10 Canvas. I swayed from the actual directions with the kit and this is what I “re-did” to show you one variation of it! The inks I used were Amaretto and Mocha Mama PowderPuff Chalk Inks (two of my much loved colors) The Paper line that is used on the canvas and in the kit is the Damsel in Distress line and the chipboard pieces were cut just for this kit. Actually the chipboard corner pieces at the top are the negative pieces from the frames that I cut apart and stacked with some bling for extra dimension (I can‘t throw anything away, lol)!

The extras I used were minimal, Flowers: Recollections from Michael’s and Bling Swirl: Forever in Time and additional Bling: Hobby Lobby. The feather’s are just some I had in my stash. That’s it, very minimal extras and actually the kit came with some Frosted Butterflies that I didn’t use along with a few extra flourishes that I can add to another project. Hope you enjoy it as much as I did creating it!

Now I don’t know about you but I love the Blingy Swirls but I hated fighting with them when trying to use them and part of the reason I did this tutorial was because while I was at the Atlanta Private Reserve Patsy (the owner of Quick Quotes) and I were talking about the easiest way to transfer bling and she said if I figure out a way to let her know, so here you go Patsy, I figured it out, this ones for you, LOL! 

I was bound and determined to figure out a way to use them so they would go where I wanted them to go and not stick to everything else so I got me out some packing tape and stuck a few pieces together………

Then I took the stickiness off by sticking it to my pants (yes these are my PJ’s it was really early in the AM before everyone was up, lol)……….

Then I put the “used” tape with still some tack over the bling that I wanted to transfer and pressed it to the bling…………

And then I started to peel back the tape with the bling attached to the tape and it stayed exactly where I wanted it to, perfectly!………….

Then I figured out where I wanted it to be positioned on my project, pressed it down, and started pulling back the tape, again perfectly in place!…………….

And here is the finished project with perfectly placed bling!!!! Now how simple was that!
And I added a few more close ups of some of the other pictures.
Some of the flowers with the feathers!
 Another angle and to show a bit of the dimension.
 And I even used a few of the throw away pieces from the laser cuts from the frames as some popped fancy unconventional photo corners! (Like I keep saying I just can't throw anything away, lol) Added some bling and you'd never know it should have been trash, lol!
Well I sure hope if you made it to the end of this book, (oops I mean post, lol) you have enjoyed it. I will be doing more of the Canvas projects, I really enjoyed this. And please make sure you stop over at the Quick Quotes Blog on Tuesdays, there will be more Techniques for, "Trendy Tuesday's"!

Have a great rest of your weekend and see you all tomorrow with BBTB2 for a new challenge and end of the month Blog Hop!

((Hugs)) and Take Care,
Theresa

Friday, September 23, 2011

You Make My "Heart" Sing! SOUS Heart Challenge

 Well hello everyone and Happy Friday! I sure hope you all have been doing good, nothing exciting going on here. Actually kind of boring, lol!
Well we have another challenge over at Stuck On U Sketches Die Cut Challenge this week and the challenge is "HEART"! Well I don't know if you all know that I have an Imagine, well I do and I don't use it near enough to justify spending the money on it so I think I got my use out of it this week, lol! I made a whole Heart Mini with it! I also used the Sweethearts cartridge too. That is what the heart shape mini is made out of cut at 5 1/2". The Imagine cartridge I used is the Better Together and the little tag and music paper heart on the front is from the Imagine More Cartridge.
After printing everything out and flipped the backside hearts (so they line up perfectly) then glued them together then I punched a hole with my Crop A Dile and added some grommets for some added enforcement and a ring to hold it together, tied some ribbon on the ring for some fun. Added some jump rings to the tag (with some added bling of course) added a little prima flower with a bling center and a piece of ribbon! Everything is inked with some Quick Quotes Mocha Mama Chalk Ink (love this stuff!) Added some foam tape for some pop and dimension also!
Doesn't it just "Make Your Heart Sing"!? It sure does mine, lol! 
 Pages 1 & 2
Added some bling, a little envelope, (one of the extras on the BT cart) with a rolled handmade flower, a cute pink doily and more foam strips for some pop and dimension. Love these two print papers too, so Cute! 
 Pages 3 & 4
The heart doilies are from the Sweethearts cart and added for photos. Added some more bling, a piece of ribbon and some older prima flowers I had a jar of that I haven't used in a L O N G time with some bling centers and all popped again.
 Pages 5 & 6
Love these print papers too. Another doily some more flowers and bling and a ribbon bow and everything is popped again.
 Pages 7 & 8
Love the little flower, so whimsical, more dimension, flowers and bling.
 Pages 9 & 10
Love Blue and Yellow together so fresh and cheery! More doilies, flowers, bling and dimension
Last Page
And as I said last page with a little frame to add a little saying to whom I give this too! Not sure who yet, or maybe I'll just keep it, lol!

Well hope you enjoyed my full Imagine project! It was fun, actually went pretty fast, but I still like my Expression, love to manipulate paper and when I use my Design Studio I don't waste as much paper as I feel I do with the Imagine but I have to say I wasn't stumped with picking papers, I always have the hardest time with patterned papers, I don't like to use my "pretty papers" (do you all do that too, lol?) and it also sizes the print size down to fit the size you pick for your image to be cut, (does that make sense) check out page 3 & 5 from above to see an example and that's a nice feature I think. I tried to fit everything as close as I could to use less paper but I couldn't manipulate it enough but I'll fiddle with it more and maybe learn a few more things, lol! If anyone knows of anyone who has some pointers I would greatly appreciate the link.
Now remember to enter the challenge over at Stuck On U Sketches Die Cut challenge this week, the theme is "Heart" so anything to do with a Heart and link up with the Link at the bottom of the post. We would love to see your "Heart"!
Have a Great weekend, we have Birthday party to go to this weekend for some good friends little boy, he's turning 3 so it should be fun! How about you, any fun plans for the weekend?

Well ((Hugs)) and Take Care,
Theresa

Saturday, September 17, 2011

Peachy Keen and Quick Quotes Blog Hop

Thank you so much for joining us for the Peachy Keen Stamps/Quick Quotes Blog Hop! If you've just come from Joanna's Blog (Scrap Making), then you are hopping along just fine. If not, make sure you start at the beginning over at Quick Quotes Blog blog so you don't miss a single chance to win one of two fun prizes up for grabs! You'll have until Sunday night, Sept. 18th at 11:59 p.m. to complete the hop!
Peachy Keen Stamps and Quick Quotes have partnered this weekend to bring you incredible creations from both Design Teams. You'll see how versatile our products truly are!
 EEK! I Love these stamps, lol! They give the best stamped image, so sharp and clear! It's a good thing I don't mind spiders because isn't this the cutest little spider! I used my Prisma colored pencils and Gamsol (Mineral Spirits) to color this little cutie. I used the Quick Quotes French Quarter Paper for my card frame and base. The Frame is cut from the Happy Haunting Cricut Cartridge and the flowers are some handmade rolled flowers I made using the QQ French Quater Paper and added some Martha Stewart Black Glitter to the tips for some sparkle. And speaking of Glitter my EEK is cut from the Happy Haunting cart and then I did my favorite packing tape technique and sprinkled glitter onto it for more sparkle! 
 Even tho the paper is black I still used QQ Midnight Confessions Powderpuff Chalk Ink to ink the green card stock to accentuate the shadow from the popped frame. The spider web is stickled, I also added some Bead in a Bottle and of course I had to add some Bling, a Crinkled Ribbon for the bow and a couple of Corsage Pins.
I used the computer for the inside of the card saying.
 Now who would be upset that I forgot their Birthday after they recieved this card, Would you be, lol!?
And EEK again!
Who wouldn't want to win one of these Great prizes!
Your next stop on the Hop will be Vivienne (Crafting Haven) 
Thanks again for stopping by! I hope you're inspired and ready to create!Don't forget to leave a comment on each designers' blog for a chance to win either a Quick Quotes prize package or two stamp sets from Peachy Keen! The deadline for commenting is 11:59pm EDT, Sunday, September 18th.

  Products used:
Pattern Paper: QQ French Quarter
Cricut Cartridge: Happy Hauntings
Flowers: Recollections and the rolled ones are made by ME!
Glitter: Martha Stewart
Bling: Hobby Lobby
Bead in a Bottle: Tulip
Corsage Pins: Wal-Mart
Spiderweb: Stickels (Gunmetal)
Pop Strips
Computer generated Birthday saying

Thursday, September 15, 2011

Quick Quotes Club Re-Do Punkin Pickin Time Fall Mini!

Hi everyone it's Quick Quotes Club Q Re-Do time!

Well I decided to Re-Do one of the mini tag books from the
September Club Q Kit. I love these fun little mini book kits! Well with the Fall seasons coming up I did the small mini tag book for upcoming Punkin Pickin time here. The kit comes with some of the Cherry Truffle paper line. Love this paper line, so Yummy and the name is Perfect, Cherry Truffle, Yummy, right!? Some of the tags have some bits and pieces of the Houndstooth paper, love this paper (can you tell I'm a bit obsessed with it right now, lol!) I inked everything with the Powder Puff Chalk Inks in: Bloody Mary, and colored my Punkin with the Green Tea, & Mango Mai Tai Inks added some pop dots and added a leaf button with a scrap piece of green ribbon and of course had to add some Black Bling!
Pages 1 & 2
 The Velum sayings are from the Quick Quotes line having to do with the Punkin Patch, attached them to cardstock then popped all of them with some foam tape for some depth and dimension and added a fun little ribbon to each of the quotes and also the tags.
Pages 3 & 4
Inked some paper doilies, velum quotes and more ribbon and bling!

 Pages 5 & 6
Matted for more pics, added a bit of ribbon, another velum quote and of course........................
More Bling!
 Here are pics of the tags and another with the front of the mini. I just used some of the scraps to embellish the tags and added the ribbon (comes in the kit) along with the copper brad. Now the larger gingham ribbon is some I had and thought it would be adorable to tie it together with an awesome bow!
So what do you think, Pretty Gorgeous if I do have to say so myself, lol!
Now all I need to do is go to the “Punkin Patch” and get some cute pictures to add in there. 
So what are you waiting for, pop on over to the Quick Quotes Store and get yourself signed up for Club Q and you could have this great little mini too!
There is also another mini that has about 15+ pages for The Sept. add on also and it is absolutely Gorgeous, pop on over there and check it out HERE!

The extras I used are: the larger black gingham ribbon is from Michael’s (all of the rest of the ribbon is in the kit) the buttons are some from my stash, the doily’s are scrap pieces left over (see I keep telling you I can’t throw anything away, lol) and Bling: Hobby Lobby

Well I sure hope I've inspired you to get creative today, it always makes me feel better and I feel like accomplished something when I get to be creative and crafty, lol, how about you!? If there's anything I can help you with please do not hesitate to drop me an e-mail or leave me a comment. Thanks for stopping by and have a great day!
((Hugs)) and Take Care!
Theresa 


Monday, September 12, 2011

Bitten By The Bug 2 Monday Challenge!

 Hi Everyone and Happy Monday! First of all I just want to take a moment and say a quick Thank You to all my Wonderful followers, Old and New! I always get a thrill when I log on to my blog and get to read the sweet comments you all leave, so a HUGE Thank You to all of You!

Well Monday's always bring a new challenge over at Bitten By The Bug 2 and today is a fun one (well they are all fun but I Really had fun with this one, lol)! It was the Amazing Jeri's turn to pick the challenge and she chose to use an oldie but a goodie, Tags, Bags, Boxes and More Cartridge for the challenge today and we were to use any of the dimensional boxes. Well for some reason I couldn't find my TBB&M cartridge, I know I own it because it was one of the very first carts I bought when I got my Cricut, back in the day, lol! (I have no idea where the heck it would be because I don't have anyone that I could share with sooooooo, the mystery continues.............!) Well I was inspired by this Adorable little Backpack I seen a while back and with school starting and all I went with a Back to school theme. There is also a challenge over at the Quick Quotes Blog with a Back To School theme with Melin and I am linking this up over there also. There is also a Guest Designer this month named Anita and she made a cute little backpack but I'm not sure if she used a Cartridge or not, she will do a tutorial later this month so I'll find out them, but hers sure is Cute also, Thanks for the inspiration Anita! Most of you know that I am on the Quick Quotes Design Team and I had the pleasure of using all Quick Quotes papers and inked everything with Mocha Mama Powderpuff Chalk Ink and if you like anything you can get some of your own over at the Quick Quotes Store.  
 Well here is that adorable little backpack and it's from the Life's a Party cartridge and I cut it @ 8 3/4" to get the most of a 12 x 12 paper and without having to use the larger 12 x 24 mat. The Houndstooth papers were perfect for this, don't you think!? And the ribbon is just too cute, perfect for back to school!
 I actually attached the tag to the backpack and of course had to use an Apple for my card/gift tag, from Create a Critter minus the face (hide contour in Design Studio and also welded to form a tiny card/tag) The Yellow gingham paper is from Quick Quotes along with the red, and used the EK Success notebook edge punch. Adds a nice touch of color and of course I had to add some Bling, in Red of course!
I also added a little mini to put on the inside with some of the leftover scraps (I just can't throw anything away, lol) Put some grommets in the corner and used a piece of ball chain to hold it together and tied a piece of that great ribbon on it! And of course more BLING!
I even made a cute little corner book mark that a Young girl named Madison inspired me to make. She had made some for the Quick Quotes Challenge #3 (Back to School) challenge and she inspired me to try them. Now I've seen them plenty of places but she just inspired me to try them for myself. It's so nice to see young people having fun with papercrafts and if you want to see her great blog just click right HERE and this will take you to her bookmark inspiration and then you can check out Madison's Blog Here, Thank You Madison for the inspiration! =] 
Now here is my Adorable little Ensemble all together and even showing the cute little bookmark fast at work, lol! I think I'll be making a few more of these and put them aside for McCade's teacher's for Xmas presents and include a gift card.
Now I sure hope you join us over at BBTB2 this week. Link up a NEW creation and if you don't have the Tags, Bags, Boxes and More cart just make a dimensional box you could use as a gift container. And make sure you stop by the BBTB2 blog and see what the Amazing Design Team created, you know they are ALL Amazing! You will have a chance to win our cute BBTB2 Blinkie you will be able to display on your blog with bragging rights of course!

Well Hope you all have a great week and remember I Love the sweet comments you all leave so if your inspired please leave me one! =]
((Hugs)) and Take Care!
Theresa
  
Product's Used:
Cartridges used: Life's a Party, Create a Critter
All pattern papers Quick Quotes (Savvy Davvy, Cherry Truffle)
Cardstock: Best Occasions (Walmart)
Ink: Mocha Mama Powderpuff Chalk Ink
Bling: Hobby Lobby
Ribbon: Michael's
Ek Success: Notebook edge punch

Friday, September 9, 2011

SOUS-Die Cut Challenge *Flower*!

 Hey everyone how are you all and Happy Friday! McCade is so happy that he gets the weekend off, he's already complaining about having to go to school, (it's only been a month) boy that makes for a L-O-N-G year, lol!
Well we're having another challenge over at Stuck On U Sketches-Die Cuts and this week the theme is "FLOWER" how Fun is that! We all use them and Love them and I had Fun, Fun, Fun with this one! As you can see I made a mini! This mini is from Quick Quotes and it was one of the kits from the Quick Quotes Private Reserve I went to a couple of weeks ago. I had a blast, 3 days of Non-Stop Scrapping! It's one of the kits that's included in your weekend of projects. It's a 6 x 6 canvas mini and all the papers are from Quick Quotes also except for the card stock which is Colorbok. Some of the flowers are from the kit and they are laser Die Cuts and then some of the flowers I used the new Flower Shoppe Cricut cartridge (l-o-v-e it and I will definitely be using it Lots in the future!) I even used a couple of flower punches on this one. This little mini is a what I am "So Thankful For" and as you can see on each of the pages there is something I'm Thankful for.........
 Page 1 & 2, My Family! This one has a pocket page and the tag has the negative piece from one of the flower cut outs from the Flower Shoppe cart and when I seen it I though it would be cute to use as a journaling space, you can write in a circle around the cutout, what do you think, I think it will look really cool!
 Okay next, page 3 & 4, My Friends! I added a little pocket with a Martha Stewart scallop punch on pg 3 with some cute little tags that I think I'll have my Friends put a little message on when I get the pics on these. Now these are interactive pages and they..................................
 Open, a great spot for Extra pictures, don't you just Love It!
 Now this is Page 5 & 6, My Children and my favorite! I just love the gingham with the Hounds tooth papers! This one has a pocket too with a large tag and a smaller one. I added some QQ Rub-ons under the tag. And yes you guessed it, it opens also.........................
 Lots of places for lots of pictures and the little frames you can add journaling or another photo.
 And last but not least Page 7 & 8, My Home! The flowers are from Quick Quotes also and from another kit Quick Quotes August Club Q kit and the punch is a Martha Stewart punch.
Now here's a great view of the fount of the Mini and the little envelope and the "So Thankful For" saying.
Now I hope you join us over Stuck On U Sketches-Die Cut "Flower" challenge and just remember it has to be a NEW Project that you link up! There is also Blog Candy to be won at the end of the month from all the challenges so the more you enter the more chances to win! Well I sure hope you have a Great weekend, hope you get to do something exciting, me, I have to get a few other projects finished and try and get ahead of my self, yea right (well a girl can dream can't she, lol, lol! 

((Hugs)) and Take Care,
Theresa 

Monday, September 5, 2011

Heart Breaker over at the BBTB2 Monday challenge!

 Hi everyone and Happy Labor Day folks!
Well over at Bitten By The Bug 2 the Design Team has been hard at work Laboring over some pretty amazing creations this week! Heather had us use the Drippy Heart on the Rock Princess cartridge as our Inspiration today and boy I can tell you I was sort of stumped on this one since I didn't have enough time to make me a layout I went with a card for this week!
 This card has many layers to it and I designed it in Design Studio. When I seen the heart the first thing that came to my mind was Heart Breaker and since I've been using the Happy Haunting cart alot lately I knew there would be something on it I could also use and that's where the Beware came from. I added a small amount of embossing on the wings and a tiny bit of silver metallic rub on cream to highlight the wings. Also used a silver Jelly roll pen to add some doodling and one lonely red rhinestone in all it's glory on the center of attention, the Drippy Heart.  
The card is small for me, lol, 4" x 4 1/2", I usually make a huge card then can't find an envelope for it even tho I can't ever send my cards straight thru the mail, they always have to be in a different type of envelope or small box, lol! I used some glitter paper for some extra glitz and I also used some of the Quick Quotes Julie Je T'aime Paper line, (these papers cut really nice in the Cricut) That's it for me this week, pretty simple huh!
Well I hope you join us and link up something NEWLY made for this challenge, you have two weeks to enter and you could win our Great Blinkie to add to your blog, along with bragging rights of course, lol! Now remember if you don't have the Rock Princess cart you can use any cart with a flying heart or a bat or even just a heart with wings, I just hope to see you over at BBTB2!

((Hugs)) and Take Care,
Theresa