Welcome to Binky Blossoms, Thank You for sharing a part of your day with me. Sit down, Relax, Listen to some Music and Just Enjoy!

Friday, October 28, 2011

Petaloo & Quick Quotes Blog Hop Day 5!

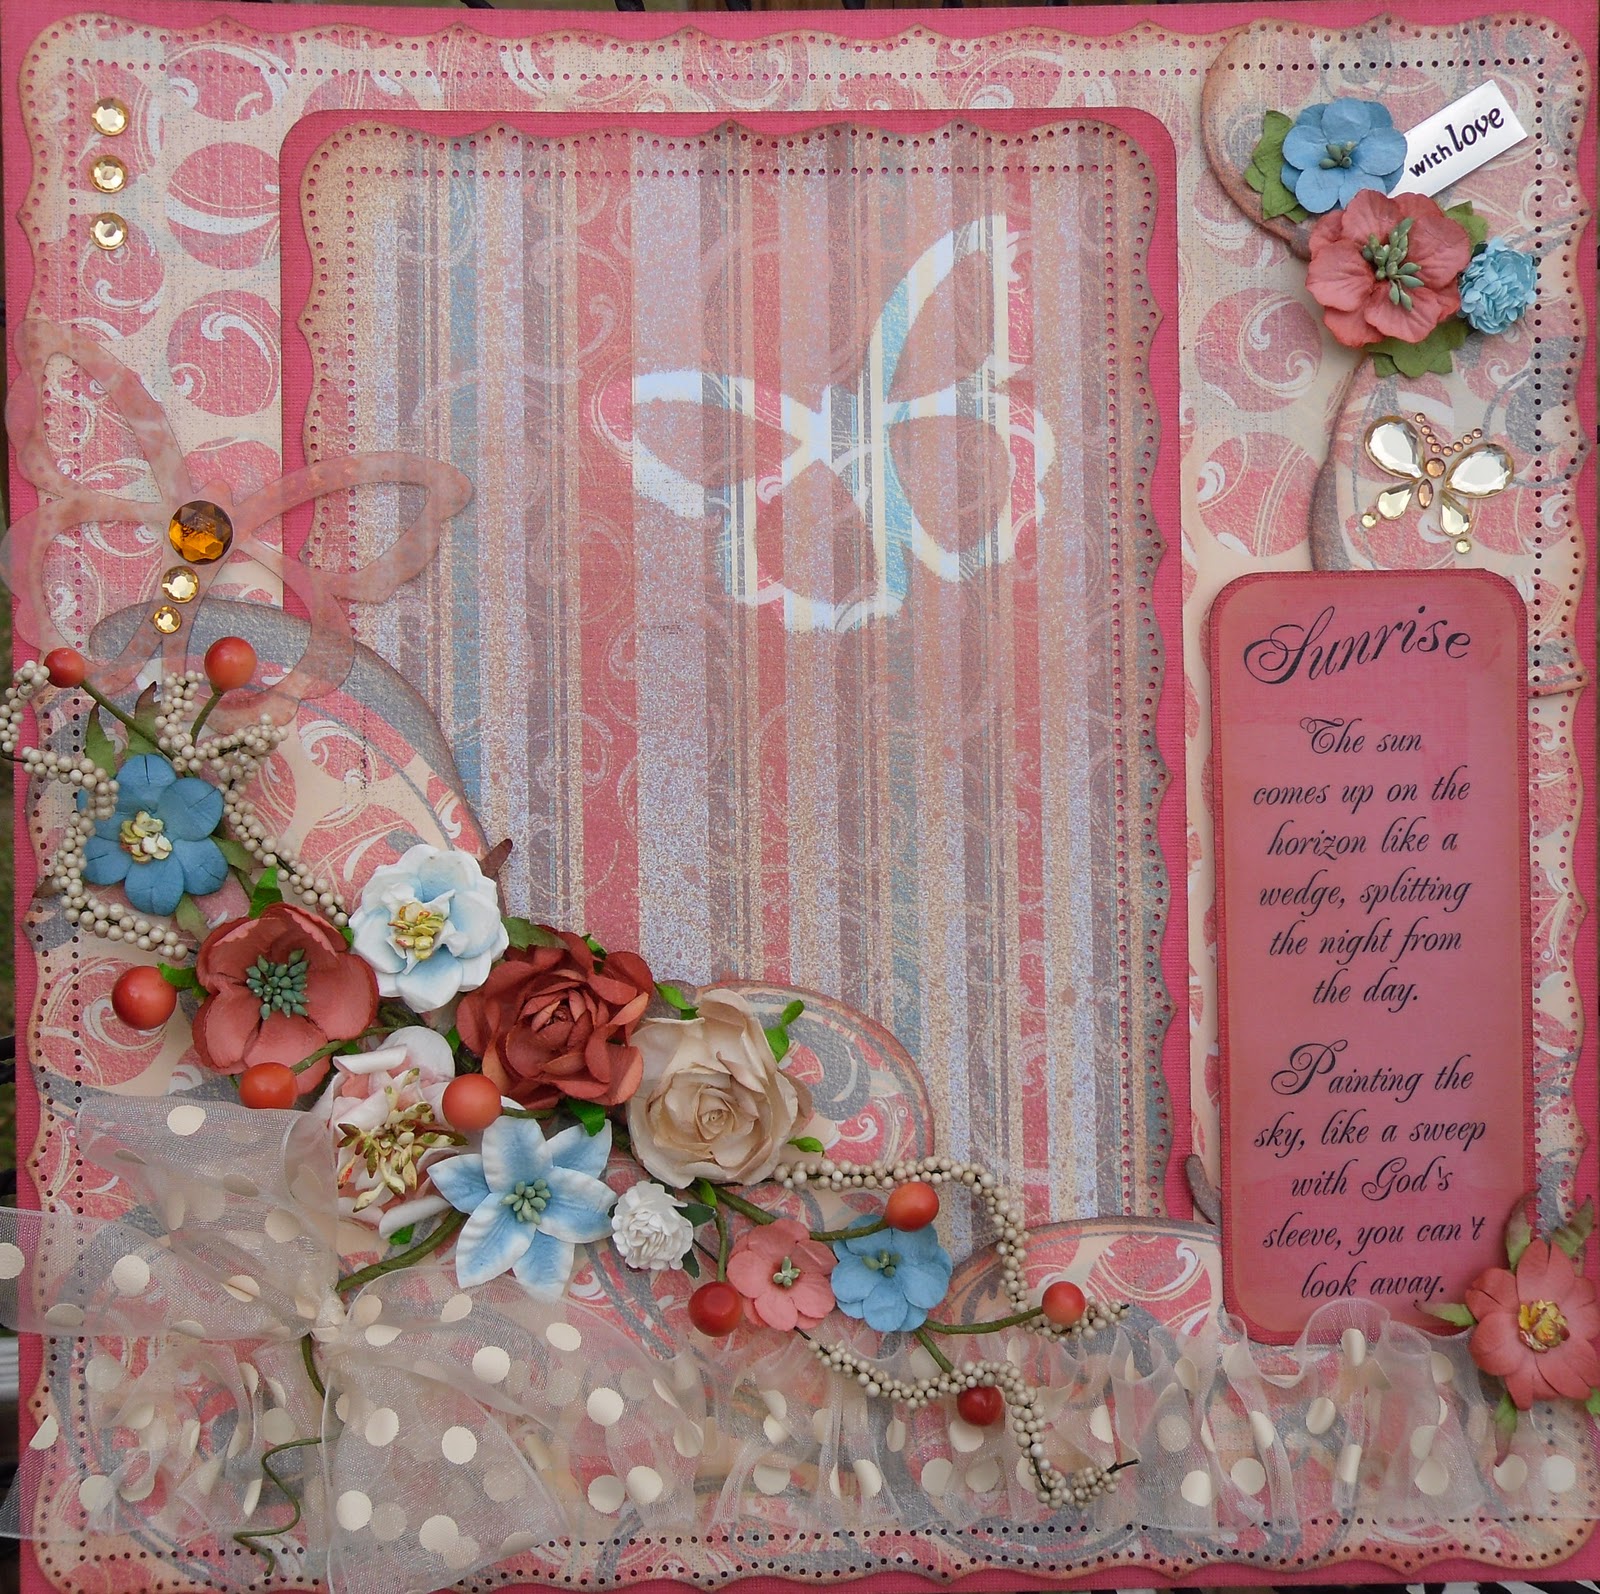
 Welcome to another day of the Quick Quotes and Petaloo Blog Hop, I sure hope you’ve enjoyed the hop and I can honestly say I was so excited to hear we were partnering with Petaloo and equally excited to share my layout using these Gorgeous Flowers! Any of you that know me know I Love Flowers, so this was right up my alley! The hardest part for me was deciding which ones to use! I wanted to use them ALL! Well I started with some fun papers. I used the Patsy's Paradise line of papers, I used a Martha Stewart punch around the page and then I fussy cut around the swirl on the QQ paper for some dimension and depth, then inked everything with Mocha Mama QQ Powderpuff Chalk Ink then popped the fussy cut layers. I also misted a Frosted Butterfly onto my paper with some of my homemade shimmer shine in a copper color and then added the misted Butterfly to the layout nestled in there with my flowers. Added some QQ Ribbon and did the Scrunched Ribbon technique from Michelle. Then I had some fun! I started layering my flowers, I used Canterberry Vine (Cream) & Berry Spray (Red), Mini Canterbury (Teal & Paprika) & Canterbury Rose x 6 (Vanilla & Paprika). It was so hard to stop but I had to add my bow so I scattered a few extra flowers in various places on the layout. I glued everything down with Beacon's 3 in 1 Glue (this glue will hold down almost anything and dries really fast) I used very minimal extras on this, The cardstock: DCWV, & Bling: Michael’s, that’s it. I sure hope I’ve inspired you to add some of these Beautiful Flowers from Petaloo and Gorgeous Papers from Quick Quotes to your next project. Enjoy!
 Here's a close up of the Gorgeous Petaloo flowers I got to use! Aren't you jealous, lol!
And here's a close up of my handmade Shimmer shine butterfly, so pretty!

Well of course what Blog Hop doesn't have fun and Prizes!? Hop on over to the QQ Blog and/or Petaloo Blog to see what you have to do and you could win some of these awesome goodies yourself!
Hope you have a great weekend, I'm going to try and get me some crafting done this weekend, what kind of plans do you all have!?

((Hugs)) and Take Care,
Theresa

Friday, October 21, 2011

You're an Original @ Quick Quotes! With A Flower Tutorial! (PIC Heavy)

Hi everyone and another post from me, can you believe it! Well I get the honor of picking the Challenge on the Quick Quotes Blog this time and I have picked "Handmade Flowers"! Any type of handmade flowers you want, Paper, Fabric, re-cycled, you get it, I just want you to try your hand at making your own originals! Now you can add some pre-made ones with your originals but I want to see something HANDMADE! And to help you out I've added a tutorial along with my post to give you just one idea for some handmade flowers. You have a week and a half to enter the challenge and link up a NEW project to the link on the Quick Quotes Blog.  
  I don’t know about you but most of us have more then one hobby that we love and I Love to sew also! I don’t get to do it as much as I like but I have some projects I have to get done for gifts so I’ve been doing a little bit. And that’s what inspired me to make this layout, along with my tissue paper flowers made out of sewing pattern tissue papers (I got at a Yard Sale for $.25 for four patterns).
Well I have to tell you I love the Houndstooth from the QQ Cherry Truffle line which is what I used on this layout! I’ve used these papers in quite a few of my projects and I’m sure it won’t be the last time, lol. I also used my Cricut and the cartridges I used are Nifty Fifties (Dressform),Forever Young (words Original & An (modified)), Lovely Labels (Scalloped Circle) and Cricut Sampler (You’re). 
 What Gal doesn't love precious gemstones and pearls, it goes perfectly with this gorgeous dress don't you think!
Now on my paper doily I spritzed it with my Homemade Sparkle Shine. And don't you just love the tiny Pom Pom trim on the bottom of the Dress (too Cute)! And my Cute button Belt Buckle!  
Now my tissue paper flowers are made with my Grand Caliber and Large Classic Scalloped circles. (tutorial following below on this post)  I inked everything with the Quick Quotes Powderpuff Chalk inks Bloody Mary and Midnight Confessions. I love these inks!  I also used our Beacon's 3-in-1 Glue to glue all the bling and flowers down. I hope this layout will inspire you to dig out your Sewing Machine too or maybe buy a new Dress, lol! Enjoy!

Now I have a treat for you all if you loved my tissue paper flowers! How about a tutorial!? Here is step by step instructions to make these fun flowers. As you all know I love my flowers and love to make my own. I've been pretty excited since I've been doing a tutorial at least once a month lately and I've been loving them so it may become a habit, lol! I Hope you enjoy it and if you don't understand anything or have any additional questions please feel free to contact me or leave me a comment here with a way to get a hold of you and I'll be happy to help if I can!
 I wanted to share with you a fun, easy and economical way to make some Gorgeous flowers! These are made with tissue paper but you can use all kinds of cool materials. All you need is a manual die cutting machine of some sort, tissue doesn't cut very well on the Cricut (at least I know it won't cut on mine but maybe yours, or you have a different die cut machine that will cut tissue). You can also cut them out by hand but a die cutting machine just makes it go quicker. 
Now I used a Spellbinders Grand Caliber and a set of Nestabilities Scalloped Circle Dies. And I used the tissue from an actual sewing pattern for my examples. But you can use tissue paper, crepe paper, regular cardstock, designer papers, fabric, tulle, lace, even burlap and denim, and I even have an example of using some packing foam, just use your imagination!
Now I made my “sandwich” of my bottom plate (Base plate-A). Dies, cutting rim facing UP. Tissue paper. Then top plate (Cutting Plate-C). (Follow the directions for your particular machine.)
Put through your machine to cut your scallops.
Now remove the scallops from the plates and dies and just crumble them up into a ball!
Separate your scallops into the same size piles...............
Make your stacks, I did larger on the bottom to smallest on the top and punch a hole in the center. I used a Crop-A-Dile but you can just use anything to punch a hole if your using a brad. You could also just glue them together if you like.
Get your brad and insert into the hole you made or just use your glue.
Once your brad is secured “scrunch” up your flower for some more fluff!
Now you can “scrunch as much or as little as you like, it just depends on how fluffy you like your flowers (and how many layers you like). And you can use anything in the center of your flowers. I used brads but you can use Buttons, vintage buttons, gemstones, bling, stamens, fuzzy pom poms, the sky’s the limit to what your imagination can come up with, the possibilities are endless.

Now here are a few more of some I was making. The ones on the left are the packing foam ones I was telling you about earlier. Now I bet you don’t throw away any tissue paper that you get from gifts you receive now, LOL! You could use all kinds of things for your flowers. What would you use when you decide to try these out, I’d sure love to know so please leave a comment with your fun ideas! Thanks for stopping by and please share your projects with us on the Idea Gallery Button above.

((Hugs)) and Take Care, Theresa!


Now the extras I used are:
Handmade Tissue Paper Flowers
Cricut: Forever Young, Nifty Fifties, Lovely Floral and Cricut Sampler.
Cardstock: DCWV, Martha Stewart & Colorbok
Punch: Martha Stewart “Cherish”
Paper Doily
Homemade Sparkle Shine (Rust/Gold color)
Red Flowers: Recollections
Bling: Hobby Lobby
Crinkle Ribbon: Hug Snug
Pop Pom Trim: $1 store
Pearl Trim: Darice
Red Necklace Trim: Making Memories
Buttons: Dress It Up
Black Jelly Roll Pen
Pop Dots and Strips


Fence Challenge with SOUS!

 Boy I've been busy, busy, busy with projects lately! I can hardly believe it myself! I have to share a kinda funny something with you all, I finished my project and was getting ready to send it over to Leah so she could add it to the SOUS blog and I was getting my write up ready and I keep everything in a notebook and check them off as I finish them and when I looked I had finished the wrong project, I got the weeks mixed up, lol! Well one good thing is that at least I'm ahead of myself for the next challenge, Woo Hoo for me! So I had to finish this layout in just a couple of hours! It's a good thing I already had it mapped out in Design Studio and I had my idea already because sometimes I just don't have a clue on what I'm going to do. It usually takes me a couple of days to create one of my layouts just because I love to add so many elements on them. So this layout is a pretty simple one for me and actually I can say, I love the way it turned out! Pretty much how I seen it in my head. And it's also good to know that I can get a project done in a couple of hours, lol!
Now my Halloween layout here is for the Stuck On U Sketchs Die Cut Challenge which is "Fence"! My inspiration for this layout is from my fellow Design Team Sister from BBTB2 Donna who does Amazing things with paper! I've been looking for this Martha Stewart punch for about 1 1/2 years and then I seen what Donna did and I just had to find it. I finally did on Ebay and this is how my layout evolved. The Cricut Cartridges I used are A Child's Year for the little Trick Or Treater's, Happy Hauntings for the Haunted House, Ghost, Bat and Saying, and then Good ole George for the Moon! 
Here's a closeup of the left side and the Haunted House is cut @ 7", the Moon @ 5 1/2" and the little Trick or Treaters @ 3". This is a "flat" layout of me, no layers and no texture. I wanted it to really show the Silhouette's of everything. And I love the "Fence" punch. There are fences on alot of the carts but I wanted to use this punch so if you want to recreate it there are some on the cartridges you could use.
Here's a close up of the right side. The Saying is cut @ 2" and the ghost @ 5". I cut the ghost to use as my Journal spot. Not to many extras, just some Bling and Ric Rac and the papers are from some very old DCWV stack.
Here's a close up of the little Trick or Treater's (aren't they the cutest!)
And another close up of those cute Trick or Treaters along with the saying!
Now make sure you pop in over to the Stuck On U Sketches Blog and see what my Amazing Design Team Sisters have created, they're all Amazing and I always love to see how we all interpret the theme for each challenge. I sure hope you join us over at SOUS for the fun "Fence" challenge. Link up your NEW project and you could win the goodies for the month. The more entries you submit the more chances you have.
Hope you have a great weekend, hopefully you'll get to do some crafting this weekend, since I have my next project all finished I may just take the weekend off, lol! Chat with you soon!
((Hugs)) and Take Care,
Theresa 

Thursday, October 20, 2011

Altered Dressforms Wall Vinettes with Teresa Collins & Quick Quotes Club Q Re-Do!

  Hi Everyone and do I have a treat for you! Grab a cup of coffee or tea because there are alot of pics for this one but I think (hope, lol) you'll enjoy it as much as I had making it!
Oh My Goodness I had soooooo much Fun (can you tell I thoroughly loved doing this!) with part of the October Quick Quotes Altered Kit. As you know by now Quick Quotes has teamed up with Teresa Collins this month for the October Club Q Kits and I couldn't wait to use the canvas kits for this fun project!    
 First of all I altered the canvas by cutting off some of the excess canvas and finishing off the inside of the opening with the cut off pieces of canvas because as you can see I’m using the “backside” and wanted them finished, then I painted the canvas with some Folk Art Metallic Pearl White Paint to add to the vintage feel of the papers and give it a dreamy shine!
 I had so much fun with this kit, I love to make little scenes when I get a chance and this was just perfect for these Gorgeous, Yummy papers!

 I made two little altered vignettes for the wall.

 I love to sew and so did my Mom so this is a tribute to her. I remember the old dress form that she had and I WISH I had it now! I made two, dimensional Dress Forms, one from the Cricut Cartridge Forever Young and one from the Nifty Fifties cartridge, both of the papers on the dress forms are QQ French Quarters papers and they went together perfectly with the Oct. Club Q Papers!
 I also added a dimensional Vintage looking Sewing Machine, also from the Nifty Fifties cartridge.
I love the vintage papers in this kit and I have so many old pictures of my Mom that I just had to use a fun Fashionista picture of her with these gorgeous vintage looking papers.
I used Quick Quotes Midnight Confessions Powderpuff Chalk Ink on the whole project for some depth. And the chipboard piece is from the Oct QQ Club Q Altered Optional kit which is also a Teresa Collins exclusive.
I hope you enjoy this as much as I had making it to share with everyone!
Here's a pic of the Oct. QQ Club Q Kit with all of the goodies you could get each month delivered right to your door.

Some of the other extras I used are:
Cricut Cartridges:Forever Young & Nifty Fifties
Cardstock: Colorbok and Martha Stewart
Paint: Folk Art Metallic Pearl White
Martha Stewart Border Punch
Swirl Bling: Recollections
Misc. other Bling: Hobby Lobby (strip of Bling is from QQ kit)
Flowers: Recollections
Corsage Pins: Walmart
Shoes and Purse Stickers: Hot off the Press
Corner Bracket and Cameo button (? from my stash)


Well I have another project that's posting tomorrow and it is on the same theme as the dressforms and I'll have a tutorial also on making tissue paper flowers so I sure hope you stop by. It's going to be a busy weekend, I have quite a few projects posting so I sure hope you get to see them all, you won't be dissappointed, I had a blast with all of them. Two Quick Quotes and a Stuck On U Sketches post so make sure you come back.

((Hugs)) and Take Care,
Theresa

Monday, October 17, 2011

Hello Kitty Happy Halloween Challenge with BBTB2!

 Good Morning my lovely followers and what Wonderful Fall weather we've been having here in Kentucky! Fall is one of my favorite times of year and living here in KY I actually get to see the seasons change. This week over at Bitten By The Bug 2 is my week to pick the challenge and since Halloween is in full swing I thought I would do something with a Halloween theme to it but I didn't want the Spooky, Scary, Gorey stuff I wanted something Cute and what's Cuter then Hello Kitty (you know it's my secret obsession, lol, well not so much now since I told you all, lol!) I picked the Hello Kitty dressed up like a Cat, kind of ironic isn't it, Hello Kitty dressed up like a Cat, ????? Anyhow if you don't have the Hello Kitty Cartridge you can use any Cat, just give it a Halloween theme please! You have two weeks to enter and it must be a NEW project and you can link it to the link on the BBTB2 Blog. Easy and you could win our Cute POW (Pick of the Week) Blinkie to add to your blog, along with brights of course! Well enough of the logistics, lets take a look at my Hello Kitty Happy Halloween Layout!
Well I did a 2 page layout as you can see. Now the papers I used are really bright and cheery but the pics don't do them justice so trust me they are almost neon bright colors.
 Here is a close up of the Left side of the layout. I cut the Hello Kitty Witch @ 6". The moon is cut @ 6" also with a shadow cut of 6 1/4" and I used the George Cartridge. The bat is cut a@ 3" and the saying is cut @ 3" also.
 Now the right side is the Star of the show, Hello Kitty Cat and she is cut @ 6" too. Now the Pumpkin is cut @ 5" and it is the card feature and I will use it as my journaling spot (you should know me by now and my hidden journaling spots.)
 Here is a close up of the Pumpkin Journal spot. I also used the Devine Swirls embossing folder (a true must have and go to folder if your new to embossing and wondering which folders to get!) Also a little piece of ribbon for a little handle on the side. 
 Now I had to add the Adorable little bat just because he's just too Darn Cute! I used the Swiss Dots folder to emboss him. (Another must have embossing folder)
 Here is a close up of the Precious Hello Kitty Witch with her fuzzy little pom pom on her hat.
And last but not least, the inspiration for the challenge this week over at BBTB2 . Isn't she the Cutest! Now the embossing folder I used on her bow and the other HK is a small butterfly folder that has a die with it that you cut, then emboss the butterfly but I like to use it for smaller pieces because the dots are really small and real close together.
Now the papers I used are some really old DCWV paper stack papers. I though I had bought a stack of Halloween papers last time we went to the city but I guess I didn't (see another sign of aging, forgetting things, lol) so I used some old ones  and they are simple but still very fun, pretty and perfect for this layout. I didn't add to much more. Some green Ric Rac, Purple Bling, a Pom Pom and some doodling dots and faux stitching with a Black Jelly Roll pen. I think I'm going to put this in a book I've been putting together for my Granddaughters with layouts I've done here and there (especially Hello Kitty) go in there. But you never know since I am a secret Hello Kitty obsessed fan I just may have to keep these, lol!
Well don't forget to go over to the BBTB2 Blog and check out what the amazing Design Team Gals created. I'm sure you'll be inspired, they are all Amazing!
Have a Great week and I sure hope you are enjoying the Fall weather. I just hope it stays around for a bit, I'm not ready for Winter!

((Hugs)) and Take Care,
Theresa  

Friday, October 14, 2011

Fall Layout and a Couple of Challenges!

 Hey everyone, can you believe it's me again with another post! This Fall layout is for a couple of challenges and I can tell you it was going to be really simple and then it just transformed!
It started out with the Oct. Quick Quotes Club Q kit which uses Teresa Collins papers which are what is in the kit this month, so fun! And I also used my Cricut. The Cartridges I used were: Celebrate with Flourish, Wild Card and Flower Shoppe. I've had some pictures of McCade when we lived in Vegas and it was his first trip to a pumpkin patch (yes there is more to Vegas then Casinos, lol) and yes he does have shorts and sandals on in Oct. It stays pretty warm there till the end of Oct. into Nov. He had so much fun and we came home with Lots of Pumpkins!  
 I also used the yummy Quick Quotes Powder Puff Chalk Inks in Mocha Mama and Midnight Confession. The ribbon is Quick Quotes Ribbon also. And what a perfect Quote, again from QQ's! I did some embossing using Devine Swirls and Dotted Swiss folders. And check out that great fence! It's a Martha Stewart deep edge punch called Iron Fence (I've been looking all over for it and finally had to break down and buy it off of Ebay, lol)! And some of the other extras are the buttons, brads and some of my Homemade Sparkly Glimmer Shine. You can kind of see it one the photo below, pretty cool huh! 
Well the two challenges I'm entering this into is the Quick Quotes One Photo Challenge that is open till 10/19/11. You are to use one photo of your choosing and anything else goes! So hope you join us over at the Quick Quotes Blog! I'm also entering this in the Cricut Circle Blogiversary Recipe challenge. You need a Title (check), at least two Cricut Cuts (check) and at least 3 buttons (check). Now the prize you could win is a Cricut Cake Machine and I've been wanting one for quite awhile. So wish me luck and I'll keep you posted!

((Hugs)) and Take Care,
Theresa

Wednesday, October 12, 2011

Another Cricut Circle Blogiversary Challenge Entry!

 Holy Cow can you believe another post and another entry for the Cricut Circle Blogiversary challenge! I haven't been entering any of the challenges for along time but I figured, heck if I'm paying for a year of the Circle then why not make it worth my while and take advantage of  "maybe" winning something, right!?
Well here is my entry for the possibility of winning an Imagine. Now as you can see, I already have an Imaging but if I win one I will have part of my daughters Xmas present! Then I can get her some carts to go with it along with some paper and other must haves for the I, and I think she would get  more use out of the I then a regular Expression just for the fact that she can "print" and cut her projects and she won't have to buy lots of different papers and all the other "stuff" that we all have to have for our E! 
 I actually like the way it came out. These are some leftover Imagine cuts and the little dragonfly was from another project and it went together perfectly for this card!
And here is the Sketch that we are to use for the challenge. Now I've just started using sketches since I joined the Quick Quotes Design Team and I can say they are fun. It is a challenge in itself to use a sketch (well at least for me it is, lol) But my card actually came out almost to the tee for the layout of the sketch, don't you think!?  
And here is another view of my card. I am sending this to a friend along with some goodies! I think she'll like it (well I sure hope she does, lol)
Thanks again for stopping by today. And again wish me luck, I'll keep you posted and who knows, you may see me one more time today and if not today, maybe tomorrow!

((Hugs)) and Take Care,
Theresa

Cricut Circle Blogiversary Challenge Entry!

 Well the Cricut Circle Blog is having some really big challenges for their Blogiversary and this one is to use your Cuttlebug as the star! Well I think I achieved this challenge. It's a REALLY simple card for me but I needed a quick Anniversary card for a friend (how funny Anniversary, Blogiversary, what a coincidence, lol) So I used the Sweethearts cart and cut it in layers as you can see. The card base is embossed with a folder I got from a bundle from HSN when I bought my Cuttlebug and I'm not sure what the name of the folder is (sorry) and then I used the trusty Swiss Dots folder. The accents are an epoxy tag that says "Lifetime of  Happiness" (Lifetime is pretty hard to see in the pic) of course some Red Bling and a pretty Red bow! I feel pretty good about this one to since it was things I've had for quite awhile and need to use (don't we all have too many things sitting around that we NEED to use, lol!)   
Well this is to win a Yudu CardShop Machine that I don't have. It is something I would love to own but have not acquired yet, lol! (See I've been pretty good about buying new things, other then some carts of course, gotta have those, lol) Well wish me luck and I'll keep you posted. Thanks for stopping in!

((Hugs)) and Take Care,
Theresa


Monday, October 10, 2011

You Know Your Old When..............BBTB2 Buzzard Challenge!

Edited to add:
Okay yes, I seen that I spelled it wrong actually AFTER I posted it and went live this morning, lol I guess I was so excited that I actually thought of a saying before I did my project I got ahead of myself!, LOL! Thanks for pointing it out, I figured someone would spot it and call me out so touche', you got me, lol!
Theresa! =] 
You Know Your Getting Old........................When the Buzzards Start Circling!!!! LOL, LOL!
Isn't that a Hoot! And I thought of it all by myself, lol! I always have a hard time with sayings so I was really excited about having one figured out even before I started my project! Well enough about my saying, lets get into the challenge this week!
Well it's Monday and challenge day over at Bitten By The Bug 2 and my Lovely, Amazingly Talented Design Team Sister and Friend, Agnes, (aka FlowerDisco) has picked the "Vulture" from the "Life's A Party" Cartridge to use this week. Now I can say this was one of the reasons I bought this cartridge (along with the cupcake wrappers) so I was excited to finally get to make it! Well the cart has a card feature on it so that made it easy. I used the tombstone card and cut it at 7". Than I cut the Vulture at 4" separately. I didn't weld them this time. I cut an additional layer tho of red for the tombstone and put some packing tape on the back of the R. I. P. cut image and added some black glitter to make it more sparkly. I also did the packing tape technique on the vultures wing section too but you can't really tell by the pics. The grass I added is from Plantin Schoolbook and cut in two sizes, 1" & 1 1/8", then layered and cut to fit the front of the tombstone. Now the bird is done in layers and I can say there are a nice amount of layers on this cart but no shadows but it turned out great even without them, you never would have even noticed I bet if I didn't say anything, lol! I popped all the different layers and did some embossing. I inked all the pieces for some added dimension. and of course, I had to add some Bling! To the tombstone and to the Vulture!    
Here is the inside of the card (I actually finished the inside) but on this one I guess I kinda had to or you wouldn't get the Joke, lol! Hey, I have to tell you a quick little story, This was our first winter here in KY and my first winter with snow. One of the cows had a baby, it was so cold and it had been snowing and I knew she was going to have it any time and was really nervous, so I had went out really early to check and sure enough there was a new baby. Well as I went out to the field I looked up and there were about 10 Vultures sitting up in the trees by the house and about another 10 down at the end of the field (about 1/4 mile from the house) it was the eeriest and weirdest feeling seeing all those vultures just sitting there. And stupid me I didn't get a picture, didn't even think about it till later, I was just so worried about the new baby. Well she was just fine, Mama was cleaning her up, there was even steam coming off of her! I even got to go up and pet her, Mama actually let me! So every time I see a Vulture I think of that baby cow! But I sure wish I had gotten a picture, lol! (Now I ALWAYS bring my camera with me, even when I go out for a walk, lol!)    
Here is a picture of the Vulture close up. You can see the embossing, layers and of course the Bling!
And here's the picture of the Vulture on the top of the tombstone. You can see it a bit better with the glittering the R. I. P. and the swirl.

Well I sure hope you join in the challenge over at the BBTB2 Blog. Just remember it has to be a NEW project to link up and you could win our cute BBTB2 winner blinkie to display on your blog along with bragging rights. You have two weeks to enter and if you don't have Life's a Party the use any scary bird or maybe a crow (there is a vulture on ZooBalloo and Zoo Day, I checked on Design Studio). I sure hope to see you there.

((Hugs)) and Take Care,
Theresa

Sunday, October 9, 2011

Let's Hang out for a Cricut Circle challenge!

 There is a few challenges going on over at the Cricut Circle and I just had to enter this one. For this challenge you have a chance to win a Cricut Cake. McCade and I have wanted one of these for awhile but have put off getting one so maybe I'll get lucky this time (Yeah Right, lol)!
You are required to use your Imagine and create a background paper and an image cut in layers and use it on your project. Well I used the cartridge Better Together and printed out a 12 x 12 sheet of paper. Love the flowers and the colors on this cart. I then cut the "Let's Hang Out" image and cut it in four layers and popped them. I added some pom-pom trim for a bow and.......................
 Printed out the cute little Phone, popped it and added a stamped "Call Me" for the inside saying! I'm going to add my phone # to it when I send it but I didn't want to for my post, (you all can understand why, lol!)
And here is a side view to show some of the dimension. I've started using my Imagine more lately. It comes in handy when I have a block on picking out papers since I hate to use my favorite paper pads, lol! (None of you do that do you, LOL!) And I like the way it sizes the print images to the size you cut your image at.
Well if I win I'll definitely be telling you all so wish McCade and I luck, he loves to bake and I love to decorate and last year we took a cake decorating class and had a blast so this would be fun for us to do together. Thanks for stopping by and I'll chat with you all later.

((Hugs)) and Take Care,
Theresa